What’s the project? Ok you have got a sewing machine or you are going to buy a sewing machine or you want to learn how to sew, easy sewing class for beginners.
Anyways, you are not alone, sewing is not as hard as many others think, and I am with you. This tutorial will walk you through the basics of using your new machine and get you sewing easily even so fast.
Yeah! sewing machines may look somehow complex to those who don’t know how to use them. However, you don’t need to fear that you can’t learn sewing.
Sewing is not as hard as you think. If you have no knowledge of sewing you can first try sewing on fabrics or on old cotton clothes and then after following all the steps one by one which I am going to tell you, you will surely learn how to sew easily.
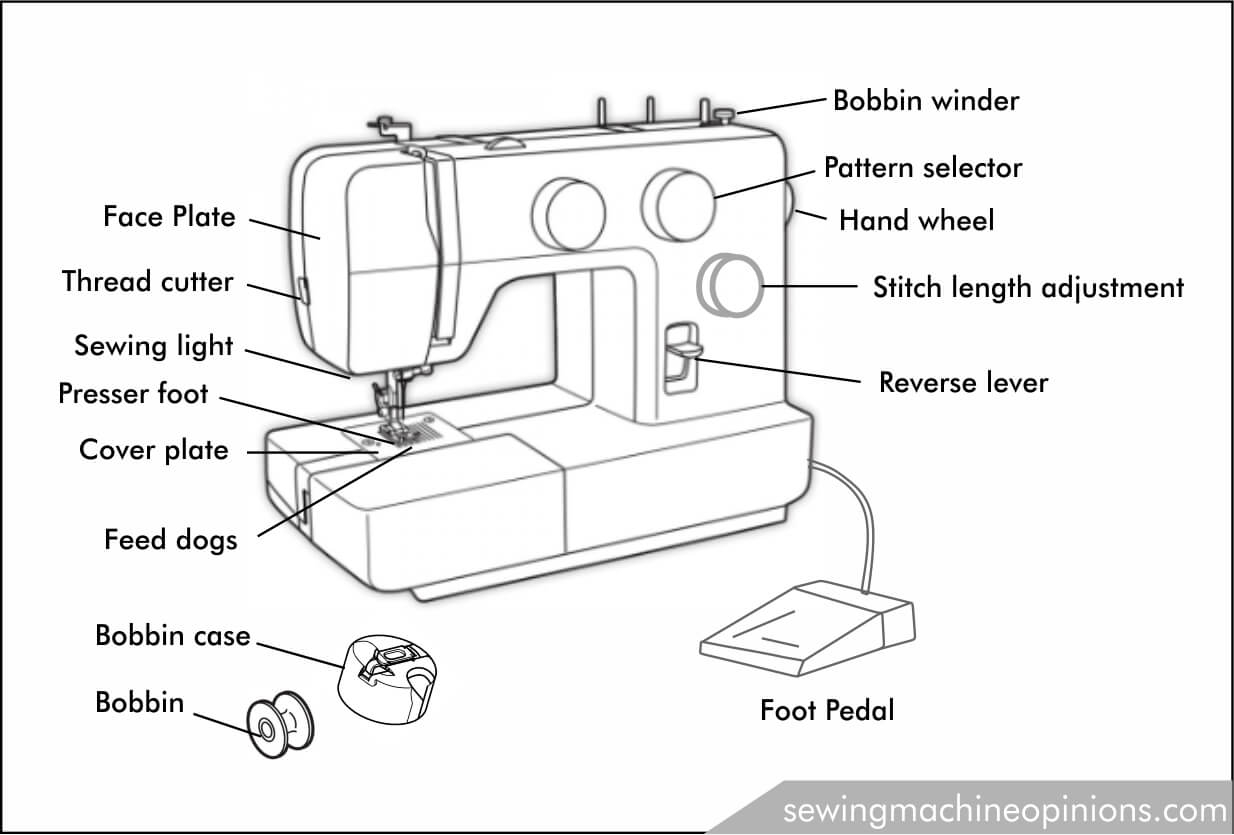
If you wanna master something, first you need to know all its parts. that’s why I think I must tell you the parts of the sewing machine with their different functions. Cheers in anticipation.
Foot pedal
It controls the speed of the sewing machine which depends on the force you exerted on it. we operate it by our legs.
Power cord and switch
The power cord supplies the electricity to the machine which must be tightly connected for a constant supply of power. It may feel bad but finding the power switch is the most important step. The power switch may be located in different places depending on the sewing machines you have, but it is normally located on the right side of the body. The power switch is used either to switch ON or OFF of the sewing machines electrically.
Handwheel
It is used for slow raising and lowering the sewing needle manually to provide better control to position fabric under the needle.
Reverse lever
It is located on the front side of the machine. It is used for making reverse stitching.
Spool pin and holder
It is a small pin either made up of plastic or metal which sticks out of the top of the sewing machine. It holds the sewing thread and also controls the sewing thread direction as it goes through the machine.
Bobbin winder
It is used to wind the thread on the empty bobbin. It may be located at the top or the right side of the sewing machine.
Pattern selector
It is used to decide the kind of stitch you want to sew on the fabrics such as simple stitch, zigzag stitches, or embroidery stitches.
Stitch length adjustment
It determines the length of the stitch you want to sew. It ranges from 0 to 4 where 0 is the shortest length stitch and 4 is the highest one.
Tension discs
Thread tension determines the firmness and looseness of the machine. Tension discs control the pressure applied to the thread for uniform feed to the needle of the machine.
Needle and needle clamp
The needle fits into the needle bar, which holds it in place with a small screw. A needle clamp is used to fix the needle in a fixed place.
Take-up lever
It is found directly above the presser foot of a sewing machine. It is the part of the sewing machine that pulls the thread out from the spool pin to feed it through the machine and lifts the thread back up out of the cloth after a stitch has been made.
Presser foot
It is used to grip the fabric. It applies downward pressure on the fabrics when it is fed under the needle.
Presser dial
It determines the quantity of pressure to be exerted on the fabric by the presser foot. For better control of fabric, lighter weight fabric needs higher pressure during stitching and vice-versa.
Feed dogs
Feed dogs are a teeth-like component that combines with the presser foot to transport the fabric by one stitch.
Face Plate
It is a plate covering all the internal working elements of the machine and protects them from dust particles.
Throat plate
It is a removable part that covers the bobbin and also has a hole to go through the bobbin casing. It is located beneath a sewing machine’s needle and presser foot. It has holes for the needle to pass through as it moves up and down to stitch the fabric.
Darning plate
A darning plate is a flat metal plate having 3 or 4 raised pins on its backside, which helps you to darn holes on your fabric. It also helps you with sewing buttonholes.
Sewing light
It helps in threading the needle and also allows you to see both in day and night time.
Presser foot lever
The primary function of the presser foot lever is to raise or lower the presser foot. When it is in the lower position, the tension disks are engaged and when it is in the upward position, the tension disks are disengaged.
Thread cutter
It is a tiny blade, attached to the left side of the sewing machine, usually located behind the needle. It cuts thread tails conveniently. You don’t need to look for scissors, you can easily cut thread tails using a thread cutter.
Slide plate
It is a movable rectangular plate that protects the bobbin case from dirt and dust. It aids in the removal of the bobbin case without lifting the sewing machine.
Bobbin case
It is a device where the bobbin has to be fixed and provides tension to the lower thread. It is located under the needle plate.
Bobbin
It is fitted onto the bobbin case. It carries the bottom sewing thread. When the bobbin thread and the needle thread loop together, a stitch is formed.
Stitch regulator
It determines the length and width of the stitches on the fabric you want. It also determines the length of your stitch.
How to sew using a sewing machine?
So you may have learned many parts of the sewing machine with their different functions. Now, you are so excited to learn sewing. Ok, don’t worry I am telling you the easiest steps for sewing on the fabrics. So be excited and have a look at the following steps one by one.
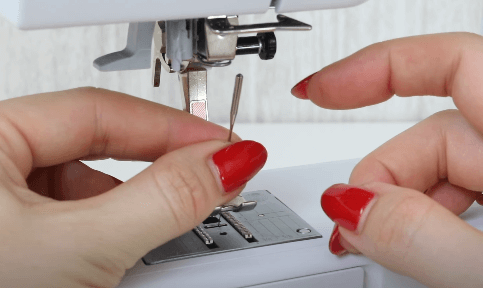
Step 1: First of all, you must know to exchange the needle because sometimes, it snaps/breaks while stitching something that is very important.

For exchanging the needle you must follow these instructions:
• Unwind the needle clamp and take out the needle from the needle clamp.
• Now, you can see that one side of the needle is flat and the other side is rounded. So now put the rounded side of the needle towards yourself and remember that the flat side of the needle should be towards the needle bar.
• Now, you must tighten the needle into the needle clamp.
5 Tips to prevent needle break
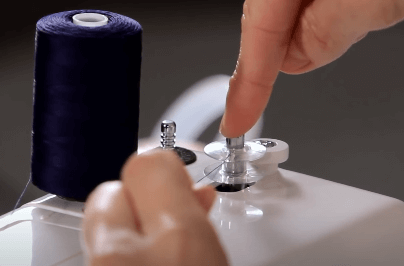
Step 2: You must know how to fill thread onto the bobbin (bobbin winding). So for bobbing winding, you must do the following instructions.

• Raise the spool holder and put the spool thread onto it.
• Remove the extension table.
• Open the bobbin compartment and pull out the bobbin case.
• Remove the bobbin from the bobbin case and take the thread from the spool through the bottom of the thread guide and let the thread pass through the bottom hole of the bobbin.
• Holding the thread end, place the bobbin onto the bobbin winder spindle.
• Pull the bobbin winder spindle to the right and then pull the balance wheel out.
• And now press the foot presser and let the bobbin be filled fully with the thread. Now cut the extra thread and pull the bobbin winder spindle to its left side.
• Pull out the bobbin from the bobbin winder spindle and put it onto the bobbin case. Now the bobbin is ready to use.
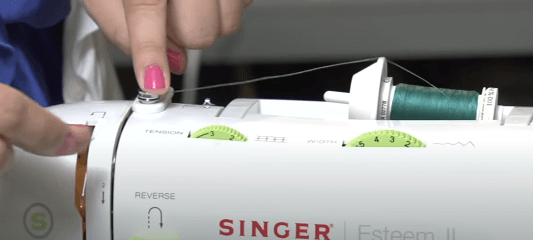
Step 3: The third step is threading the machine. As you already know without threading the machine, we can’t even imagine sewing using a sewing machine.

So for threading the machine, you must follow these instructions:
• Lift the spool up on the top of the machine and put the thread onto it.
• Raise the thread take-up lever to the highest position.
• Pull the thread through the top of the thread guide.
• Pull the thread down towards you.
• Again, pull the thread back up through the U-shaped, generally called take-up lever.
• Bring the thread down to the needle through any hooks to hold the thread.
• Now, thread the needle from the front to the back.
• Again, join the needle thread to the bobbin thread. Now the machine is ready to sew.
For your first easy sewing project, let’s have a look at the demo:
How to Sew a Pillow Cover?
Sewing a pillow cover may not be as hard as you think. I hope you will sew a simple pillow cover after following the easiest instructions below:
Step 1: Take a flexible measuring tape and measure the length and width of your pillow.
Step 2: Take a piece of cloth and fold it equally, having the length 2 inches longer and width 4 inches wider than the size of your pillow.
Step 3: Wash and dry up your cloth. After drying, iron the folded cloth.
Step 4: Fold an upper and lower piece of cloth outward by 1/2 inch and stitch them.
Step 5: Fold the lower piece of cloth by 4 inches on the upper piece of cloth from top to bottom.
Step 6: Straight-stitch all the sides of clothes together on your sewing machine by 1/2 inch seam allowance.
Step 7: Trim all the sewn sides of the pillow cover by 1/4 inch. Turn the pillow cover right side out.
Step 8: Again, stitch all the sides of the pillow cover by 1-inch seam allowance.
Step 9: Now your pillow cover is ready to insert your pillow into the pillowcase.

Hi, I check your new stuff regularly. Your writing style is witty, keep up the good work!
I think this is one of the most significant information for me.
And i’m glad reading your article. But wanna remark on few general things, The website style is great, the articles is really nice :
D. Good job, cheers