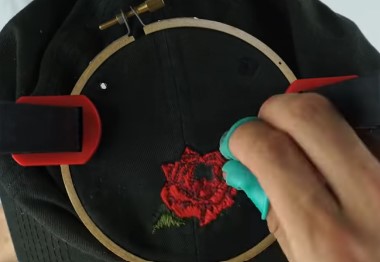
Embroidering a hat is a great way to add a personal touch and experience to your headwear. In this article, we’ll be providing you with two ways to embroider your hats. They are hand embroidering and machine embroidering.
Here’s a step-by-step guide on how to embroider a hat by hand.
Material required:
- A hat
- An Embroidery hoop
- Embroidery floss or thread
- Embroidery needle
- Water-soluble stabilizer
- Scissors
- Embroidery design
- An embroidery machine (optional)
Step 1: Gather or collect your required materials. Choose an embroidery design for your hat, and thread your needle with a good quality embroidery floss or thread.
Step 2: Position the hat on a plane surface. Use a water-soluble stabilizer underneath the area of your hat where you’re going to embroider. Using water-soluble stabilizers avoids shifting or stretching.
Step 3: If you want to embroider your hat with hand embroidery, make sure to keep the fabric tight, secure, and centered.
For machine embroidering hats,
Hoop the stabilizer and hat together, then choose the design for the machine and start the embroidering. You can even add your own designs to the hat embroidery machine via the internet or USB port.
Step 4: Now, start embroidering the design onto the hat. Go slowly and be careful not to pull or stretch the fabric while you’re embroidering. Use small, tight stitches, and keep your design as close to the center of the hat as possible.
Step 5: When you’re finished with the embroidery, remove the hat from the hoop. Carefully remove the stabilizer, making sure not to cut the embroidery threads.
Step 6: Once you’ve finished, press the hat with a warm iron and dry it in the air.
How To Embroider A Hat With An Embroidery Machine?
Hat embroidering by an embroidery machine is a bit different than hand embroidering, but remember it is a faster and more efficient way to add designs to headwear. Here’s a step-by-step guide on how to embroider a hat with an embroidery machine:
Materials needed:
- A Hat
- A good embroidery machine
- Embroidery thread
- Cutaway Stabilizer
- Embroidery hoop
- Embroidery design
- Scissors
Step 1: Gather or collect your required materials. Start your embroidery machine, choose an embroidery design and thread the machine with good-quality embroidery floss or thread.
Step 2: Position your hat on the flat surface and then attach the stabilizer to the backside of the area where you want to do embroidery.
Step 3: Hoop the hat and the stabilizer together, making sure the fabric is tight and centered.
Step 4: Start your hat embroidery machine and adjust the settings. Choose your favorite designs using the LCD screen and start embroidering the design onto your hat.
Step 5: Keep watching the embroidery process, making sure the fabric is staying taut in the hoop and the thread isn’t tangling. If you notice any problem while embroidering, pause embroidering and fix the issue before continuing.
Step 6: Once the machine finished stitching your designs onto the hat, remove the hat from the hoop and carefully cut away any excess stabilizer. Keep in mind not to cut the embroidery threads.
Step 7: Finally, press the hat with a warm iron and dry it in the air.
Some Tips You Must Consider While Embroidering
- It’s better to use cotton or polyester fabric for embroidering hats.
- Choose good quality threads.
- You must use a water-soluble stabilizer.
- Adjust the embroidery machine’s tension.
- If you’re a beginner, make sure to choose easy designs before embroidering hats.
- Have patience and keep practicing for better outcomes.
- Embroidering a hat with an embroidery machine is far and away better than hand embroidering a hat.
How To Embroider A Hat- Conclusion
Embroidering a hat can be a fun and memorable project, and it’s a great way to give a personal touch to headwear. With practice and patience, you’ll be able to create beautiful and detailed designs that are sure to be admired by others.
You can also use different embroidery techniques to add texture, interest, or special effects to your designs, such as a mix of satin stitches, backstitch, or chain stitch. The possibilities are endless!
Also, you can use different types of hats for your embroidery designs such as baseball caps, beanies, fedoras, and more, this way you can showcase your designs in different shapes and styles.
Lastly, embroidering hats can be a great business opportunity as well, you can create custom designs and logos for sports teams, brands, or even individuals looking for home embroidery projects.
Looking for the best embroidery machine for hats check here.
